สารจากผู้เขียน
สวัสดีเพื่อน ๆ ทุกคนกันด้วยนะครับ ห่างหน้าหายตากันไปซะนานเลยในวันนี้แอดเอ้ย ผมจะขอพามาสร้าง Game จับคู่เล่นกันเพลิน ๆ จะเล่นคนเดียว หรือเล่นกับเพื่อนก็ได้ ด้วย JavaScript กันครับ ถ้าพร้อมแล้วก็ไปเริ่มกันเลย !

สวัสดีเพื่อน ๆ ทุกคนกันด้วยนะครับ ห่างหน้าหายตากันไปซะนานเลยในวันนี้แอดเอ้ย ผมจะขอพามาสร้าง Game จับคู่เล่นกันเพลิน ๆ จะเล่นคนเดียว หรือเล่นกับเพื่อนก็ได้ ด้วย JavaScript กันครับ ถ้าพร้อมแล้วก็ไปเริ่มกันเลย !
 เขียนโดย
Chairawit Iamkhajornchai
Internship @ borntoDev
บทความนี้ตีพิมพ์ และ เผยแพร่เมื่อ 04 สิงหาคม 2566
ให้เราเริ่มต้นพิมพ์ doc ลงไปแล้ว กด enter ปุ๊บ ก็จะได้โครงพื้นฐานสำหรับ HTML มากันแล้ว จากนั้นให้ทำการเพิ่ม Title เข้าไป โดยผมจะใส่ชื่อไว้ว่า Matching Mind Game ละกันนะ
<html lang="en">
<head>
  <meta charset="UTF-8">
  <meta name="viewport" content="width=device-width, initial-scale=1.0">
  <title>Document</title>
</head>
<body>
  <h1 class="title">Matching Mind Game</h1>
</body>
</html>
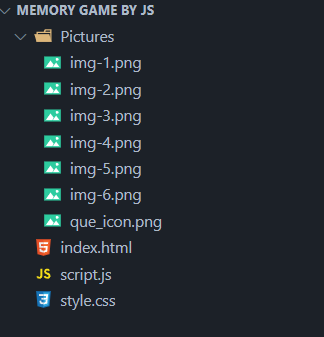
ต่อมาให้เพื่อน ๆ ทำการสร้าง class ชื่อว่า wrapper ขึ้นมาโดยชั้นในก็มี class ที่ชื่อว่า card ซ้อนอยู่อีกทีนะแล้วก็แสดงทำการตั้งให้แสดง รูปภาพเอาไว้ภายใน card และอย่าลืมเพิ่มส่วนเชื่อมเรียกใช้ Styles กันด้วยนะ
<!DOCTYPE html>
<html lang="en" dir="ltr">
<head>
  <meta charset="utf-8">
  <title>Memory Matching Game </title>
  <link rel="stylesheet" href="style.css"> //เรียกใช้ styles
  <meta name="viewport" content="width=device-width, initial-scale=1.0">
</head>

<body>
  <div class="outer-wrapper">
  <h1 class="title">Matching Mind Game</h1>
  <div class="wrapper">
    <ul class="cards">
      <li class="card">
        <div class="view front-view">
          <img src="Pictures/que_icon.png" alt="icon">
        </div>
        <div class="view back-view">
          <img src="Pictures/img-1.png" alt="card-img"class="card-img">
       </div>
     </li>
เมื่อเราทำถึงตรงนี้แล้วให้เราทำแบบนี้อีก 11 รอบนะครับเพราะว่าการ์ดในเกมเราจะมีทั้งหมด 12 ใบที่ต้องมาจับคู่กันนั่นเอง เมื่อเพื่อน ๆ ทำครบแล้วก็จะได้ประมาณนี้เลย
<!DOCTYPE html>
<html lang="en" dir="ltr">
<head>
<meta charset="utf-8">
<title>Memory Matching Game </title>
<link rel="stylesheet" href="style.css"> //เรียกใช้ styles
<meta name="viewport" content="width=device-width, initial-scale=1.0">
</head>
<body>
<div class="outer-wrapper">
<h1 class="title">Matching Mind Game</h1>
<div class="wrapper">
<ul class="cards">
<li class="card">
<div class="view front-view">
<img src="Pictures/que_icon.png" alt="icon">
</div>
<div class="view back-view">
<img src="Pictures/img-1.png" alt="card-img"class="card-img">
</div>
</li>
<li class="card">
<div class="view front-view">
<img src="Pictures/que_icon.png" alt="icon">
</div>
<div class="view back-view">
<img src="Pictures/img-2.png" alt="card-img"class="card-img">
</div>
</li>
<li class="card">
<div class="view front-view">
<img src="Pictures/que_icon.png" alt="icon">
</div>
<div class="view back-view">
<img src="Pictures/img-3.png" alt="card-img"class="card-img">
</div>
</li>
<li class="card">
<div class="view front-view">
<img src="Pictures/que_icon.png" alt="icon">
</div>
<div class="view back-view">
<img src="Pictures/img-4.png" alt="card-img"class="card-img">
</div>
</li>
<li class="card">
<div class="view front-view">
<img src="Pictures/que_icon.png" alt="icon">
</div>
<div class="view back-view">
<img src="Pictures/img-5.png" alt="card-img"class="card-img">
</div>
</li>
<li class="card">
<div class="view front-view">
<img src="Pictures/que_icon.png" alt="icon">
</div>
<div class="view back-view">
<img src="Pictures/img-6.png" alt="card-img"class="card-img">
</div>
</li>
<li class="card">
<div class="view front-view">
<img src="Pictures/que_icon.png" alt="icon">
</div>
<div class="view back-view">
<img src="Pictures/img-1.png" alt="card-img"class="card-img">
</div>
</li>
<li class="card">
<div class="view front-view">
<img src="Pictures/que_icon.png" alt="icon">
</div>
<div class="view back-view">
<img src="Pictures/img-2.png" alt="card-img"class="card-img">
</div>
</li>
<li class="card">
<div class="view front-view">
<img src="Pictures/que_icon.png" alt="icon">
</div>
<div class="view back-view">
<img src="Pictures/img-3.png" alt="card-img"class="card-img">
</div>
</li>
<li class="card">
<div class="view front-view">
<img src="Pictures/que_icon.png" alt="icon">
</div>
<div class="view back-view">
<img src="Pictures/img-4.png" alt="card-img"class="card-img">
</div>
</li>
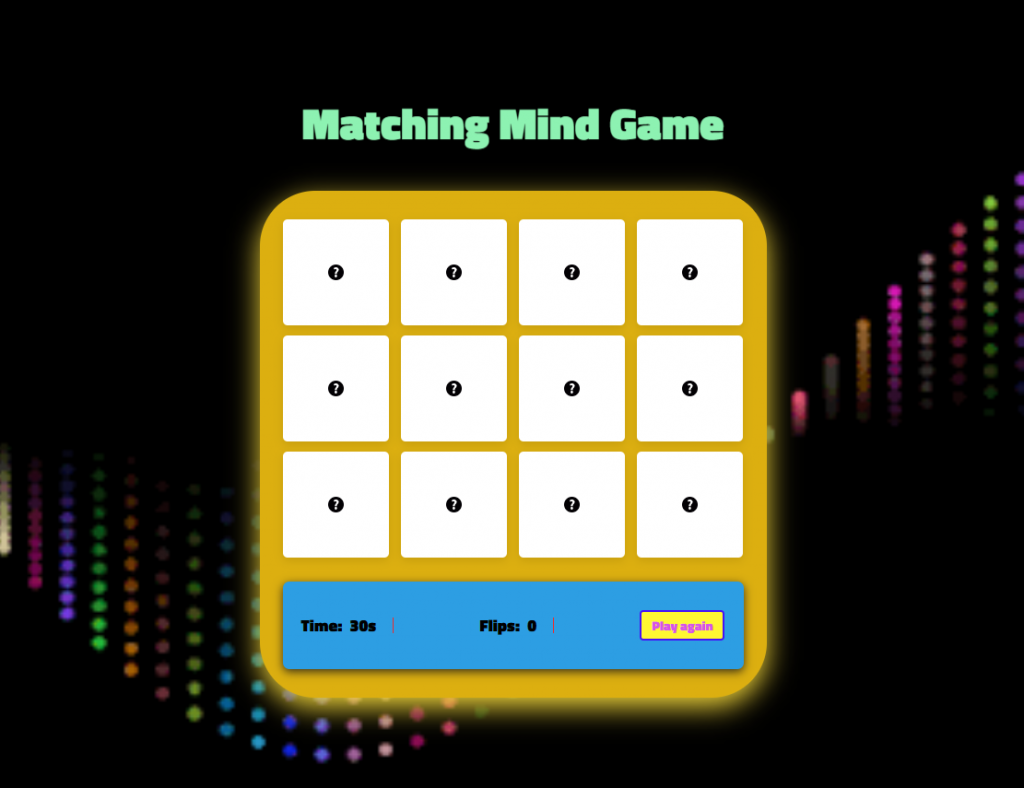
<div class="details">
<p class="time">Time: <span><b>30</b>s</span></p>
<p class="flips">Flips: <span><b>0</b></span></p>
<button>Play again</button>
</div>
</ul>
</div>
</div>
<script src="script.js"></script>
</body>
</html>โดยในส่วนนี้ตัวเกมของเราจะมีการแสดงเวลา โดยเริ่มต้นที่ 30 วินาทีและมีการแสดงจำนวนการเปิดรูปให้เห็นอีกด้วยแหละ และก็ปิดท้ายด้วยการเชื่อมการทำงานกับ script.js ที่เรากำลังจะทำในส่วนถัดไป
เริ่มต้นก็ประกาศตัวแปรด้วยกัน 4 ตัวในรูปแบบ const ได้แก่ card, timeTag (แสดงเวลาที่เหลือ), flipsTag (แสดงยอดการเปิดรูป), refeshBtn (สำหรับเล่นใหม่อีกรอบ)
และก็ประกาศตัวแปรด้วย let เพิ่มอีก 7 ตัว ได้แก่
maxTime เวลาสูงสุด 30 วินาที, timeLeft อ้างอิงจาก maxTime และ flips, matchcard, disableDeck, isPlaying สำหรับเช็คสถานะการเล่นของผู้เล่น, cardOne, cardTwo, Timer ที่ไว้จัดเก็บรูปการ์ดคู่กับเวลา
const cards = document.querySelectorAll(".card"),
timeTag = document.querySelector(".time b"),
flipsTag = document.querySelector(".flips b"),
refreshBtn = document.querySelector(".details button");
let maxTime = 30;
let timeLeft = maxTime;
let flips = 0;
let matchedCard = 0;
let disableDeck = false;
let isPlaying = false;
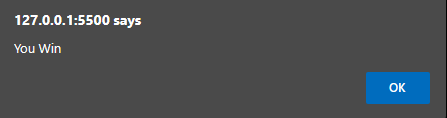
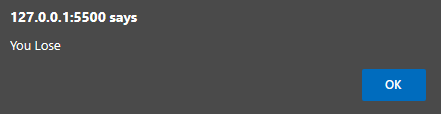
let cardOne, cardTwo, timer;เริ่มกันที่ Function ตัวแรก “initTimer”เมื่อเริ่มเกมจะ Set Condition เอาไว้ หากจับคู่การ์ดครบ 6 คู่ ก็จะแสดง You Win แต่ถ้าหากเวลาหมดแล้วยังทำไม่สำเร็จให้แสดง You Lose และเมื่อเริ่มจับคู่ก็จะทำการลดเวลาลงไปเรื่อย ๆ
function initTimer() {
  if (timeLeft <= 0) {
    clearInterval(timer);
    if (matchedCard === 6) {
      alert("You Win");
    } else { cards.forEach((card) => card.removeEventListener("click", flipCard));
      setTimeout(() => {
        alert("You Lose");
      }, 500);
    }
    return;
  }
  timeLeft--;
  timeTag.innerText = timeLeft;
}
แสดงข้อความให้ผู้เล่นทราบ
ส่วนต่อมาจะเป็น Function “flipcard” สำหรับเช็คเปิดรูปการ์ดในเกม
function flipCard({ target: clickedCard }) {
  if (!isPlaying) {
    isPlaying = true;
    timer = setInterval(initTimer, 1000);
  }
  if (clickedCard !== cardOne && !disableDeck && timeLeft > 0) {
    flips++;
    flipsTag.innerText = flips;
    clickedCard.classList.add("flip");
    if (!cardOne) {
      return (cardOne = clickedCard);
    }
    cardTwo = clickedCard;
    disableDeck = true;
    let cardOneImg = cardOne.querySelector(".back-view img").src,
      cardTwoImg = cardTwo.querySelector(".back-view img").src;
    matchCards(cardOneImg, cardTwoImg);

    if (matchedCard === 6) {
      clearInterval(timer);
      setTimeout(() => {
        alert("You Win");
      }, 500);
    }
  }
  if (timeLeft <= 0 && matchedCard !== 6) { clearInterval(timer); setTimeout(() => {
      alert("You Lose");
    }, 500);
  }
}
โดยการทำงานก็จะ Set Condition ไว้ถ้าหากมีการเล่นอยู่ก็ให้เวลาดำเนินต่อไป
และ Condition เมื่อมีการเลือกรูปการ์ดใบแรกให้เปิดออกมา โดยแสดงรูปการ์ดที่เราได้เก็บไฟล์เอาไว้ด้วยการใช้คำสั่ง querySelector และทำการตั้ง Condition เมื่อเปิดการ์ดให้ทำการเช็คพร้อมเงื่อนไขถ้าเกมจบให้แสดงข้อความโดย delay 0.5 วินาที
ต่อมาจะเป็น Function “matchCards” สำหรับตรวจสอบการ์ดว่าตรงกันไหม
function matchCards(img1, img2) {
  if (img1 === img2) {
    matchedCard++;
    if (matchedCard == 6 && timeLeft > 0) {
      return clearInterval(timer);
    }
    cardOne.removeEventListener("click", flipCard);
    cardTwo.removeEventListener("click", flipCard);
    cardOne = cardTwo = "";
    return (disableDeck = false);
  }

  setTimeout(() => {
    cardOne.classList.add("shake");
    cardTwo.classList.add("shake");
  }, 400);

  setTimeout(() => {
    cardOne.classList.remove("shake", "flip");
    cardTwo.classList.remove("shake", "flip");
    cardOne = cardTwo = "";
    disableDeck = false;
  }, 1200);
}
Set Condition หากการ์ดที่เปิดมาเหมือนกันให้แสดงและเก็บยอดไว้
และถ้าการ์ดไม่เหมือนกันก็ให้ทำการปิดการ์ดกลับไปตำแหน่งเดิม
เมื่อเปิดการ์ดแล้วจะมีการเล่น Animation “shake” การ์ดจะถูกเขย่า ถ้าเปิดแล้วไม่ถูกต้อง
function shuffleCard() {
  timeLeft = maxTime;
  flips = matchedCard = 0;
  cardOne = cardTwo = "";
  clearInterval(timer);
  timeTag.innerText = timeLeft;
  flipsTag.innerText = flips;
  disableDeck = isPlaying = false;

  let arr = [1, 2, 3, 4, 5, 6, 1, 2, 3, 4, 5, 6];
  arr.sort(() => (Math.random() > 0.5 ? 1 : -1));

  cards.forEach((card, index) => {
    card.classList.remove("flip");
    let imgTag = card.querySelector(".back-view img");
    setTimeout(() => {
      imgTag.src = `Pictures/img-${arr[index]}.png`;
    }, 500);
    card.addEventListener("click", flipCard);
  });
}

shuffleCard();

refreshBtn.addEventListener("click", shuffleCard);

cards.forEach((card) => {
  card.addEventListener("click", flipCard);
});
ในส่วนนี้จะเป็น Function “shuffleCard” ที่จะทำงานโดยทุกครั้งเมื่อเริ่มเกม ตำแหน่งการ์ดจะถูกสลับให้ไม่ซ้ำกันในแต่ละรอบ โดยการจัดเก็บไว้ใน array และ sort ตามด้วย Math.random โดยใช้การทำงาน Loops ด้วย forEach ดึงรูปภาพแต่ละรูปมาแสดงใน Path รูปภาพของเรา และทำการสลับชุดรูปการ์ดทุกครั้งเมื่อเล่นเกมด้วย shuffleCard();
ตามด้วยปุ่ม Play again เมื่อกดแล้วจะเริ่มเล่นใหม่และทำการสลับรูปการ์ดทุกครั้ง
และยอดจำนวนการกดคลิกการ์ดของเราที่ใช้ forEachในการตรวจจับ
โดยในส่วนนี้ผมจะขอไม่อธิบายมากนะครับ เพราะมันเป็นรสนิยมของแต่ละคนด้วยแหละ ใครชอบอยากตกแต่งแบบไหนก็ตามสะดวกเลยนะ
/* Import Google Font - Titillium Web */
@import url(https://fonts.googleapis.com/css?family=Titillium+Web:900);
*{
  margin: 0;
  padding: 0;
  box-sizing: border-box;
  font-family: 'Titillium Web';
}
p{
  font-size: 20px;
}
h1.title {
  font-size: 48px;
  font-weight: bold;
  text-align: center;
  margin-bottom: 20px;
  color: #ffffff;
  position: relative;
  animation: waveAnimation 2s ease-in-out infinite, colorChangeAnimation 6s ease-in-out infinite;
}
body{
  display: flex;
  align-items: center;
  justify-content: center;
  min-height: 100vh;
  background: url("https://i.pinimg.com/originals/c6/c1/1d/c6c11d8ba0b9f26caf0a6a8ee3a3e78e.gif") no-repeat fixed center ;
  background-size: cover;
  background-position: top center;
}
::selection{
  color: #000000;
  background: #ffef3e;
}
.wrapper{
  padding: 25px;
  background: #dcaf10;
  border-radius: 60px;
  box-shadow: 0 10px 30px rgba(255, 226, 62, 0.94);
  display: flex;
  flex-direction: column;
  align-items: center; /* Add this line to center the content horizontally */
}
.cards, .card, .view, .details, p{
  display: flex;
  align-items: center;
  justify-content: center;
}
.cards{
  height: 500px;
  width: 500px;
  border-radius:40px;
  flex-wrap: wrap;
  justify-content: space-between;
}
.cards .card{
  cursor: pointer;
  position: relative;
  perspective: 1000px;
  transform-style: preserve-3d;
  height: calc(100% / 4 - 10px);
  width: calc(100% / 4 - 10px);
}
.card.shake{
  animation: shake 0.35s ease-in-out;
}
@keyframes shake {
  0%, 100%{
    transform: translateX(0);
  }
  20%{
    transform: translateX(-10px);
  }
  40%{
    transform: translateX(10px);
  }
  60%{
    transform: translateX(-6px);
  }
  80%{
    transform: translateX(6px);
  }
}
.cards .card .view{
  width: 100%;
  height: 100%;
  user-select: none;
  pointer-events: none;
  position: absolute;
  background: #fff;
  border-radius: 5px;
  backface-visibility: hidden;
  transition: transform 0.25s linear;
  box-shadow: 0 3px 10px rgba(0,0,0,0.1);
}
.card .back-view {
  transform: rotateX(-180deg);
  background-size: cover;
  background-position: center;
  background-repeat: no-repeat;
  border-radius: 5px;
}
.card .front-view img{
  max-width: 17px;
}
.card .back-view{
  transform: rotateX(-180deg);
}
.card .back-view img {
  max-width: 100%;
  height: 100%;
  object-fit: contain;
}
.card.flip .front-view{
  transform: rotateY(180deg);
}
.card.flip .back-view{
  transform: rotateY(0);
}

.details{
  width: 100%;
  margin-top: 15px;
  padding: 0 20px;
  border-radius: 7px;
  background: #2d9ee3;
  height: calc(100% / 4 - 30px);
  justify-content: space-between;
  box-shadow: 0 3px 10px rgba(28, 25, 25, 0.845);
}
.details p{
  font-size: 18px;
  height: 17px;
  padding-right: 18px;
  border-right: 1px solid #ee2c2c;
}
.details p span{
  margin-left: 8px;
}
.details p b{
  font-weight: 500;
}
.details button{
  cursor: pointer;
  font-size: 14px;
  color: #d341ffe6;
  border-radius: 4px;
  padding: 4px 11px;
  background: #fff832;
  border: 2px solid #4611f7;
  transition: 0.3s ease;
}
.details button:hover{
  color: #fff;
  background: #c10606;
}

@media screen and (max-width: 700px) {
  .cards{
    height: 350px;
    width: 350px;
  }
  .card .front-view img{
    max-width: 16px;
  }
  .card .back-view img{
    max-width: 40px;
  }
}

@media screen and (max-width: 530px) {
  .cards{
    height: 300px;
    width: 300px;
  }
  .card .back-view img{
    max-width: 35px;
  }
  .details{
    margin-top: 10px;
    padding: 0 15px;
    height: calc(100% / 4 - 20px);
  }
  .details p{
    height: 15px;
    font-size: 17px;
    padding-right: 13px;
  }
  .details button{
    font-size: 13px;
    padding: 5px 10px;
    border: none;
    color: #fff;
    background: #cc5a2d;
  }
}
ในส่วนนี้เราจะทำการ import Fonts จาก Google Font มาใช้กัน และก็แต่ง Title, Body, Card, Details ที่เป็นส่วนประกอบหลักในเกมของเราให้ดูสวยงาม มีลูกเล่นเพิ่มมากขึ้น เมื่อเสร็จแล้วตัวเกมของเราก็จะได้หน้าตาเป็นแบบนี้เลยยย😉👌
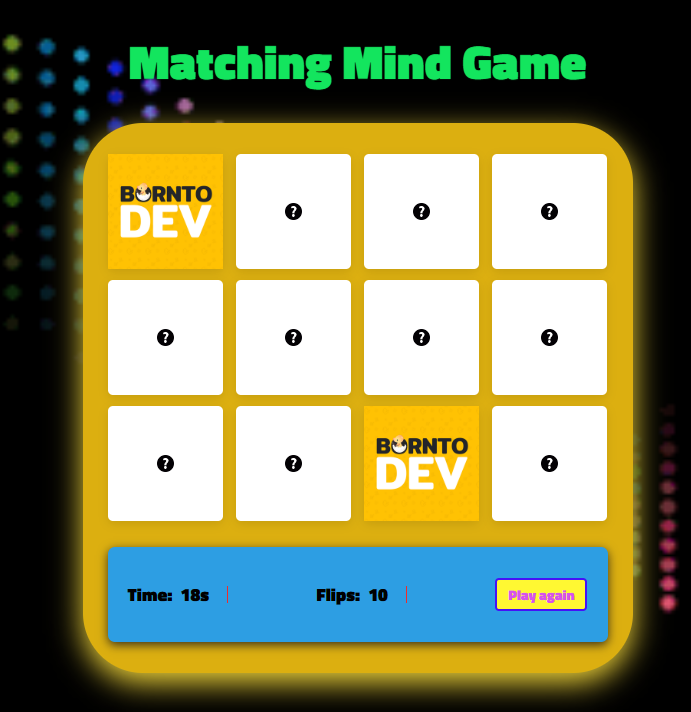
เมื่อจับคู่ภาพผิดรูปก็จะสั่นแล้วปิดกลับที่เดิมโดยถ้าดูจากรูปแล้วเพื่อน ๆ ทุกคนก็อาจจะยิ้มกันอยู่ก็เป็นได้นะ😅🔴🟠
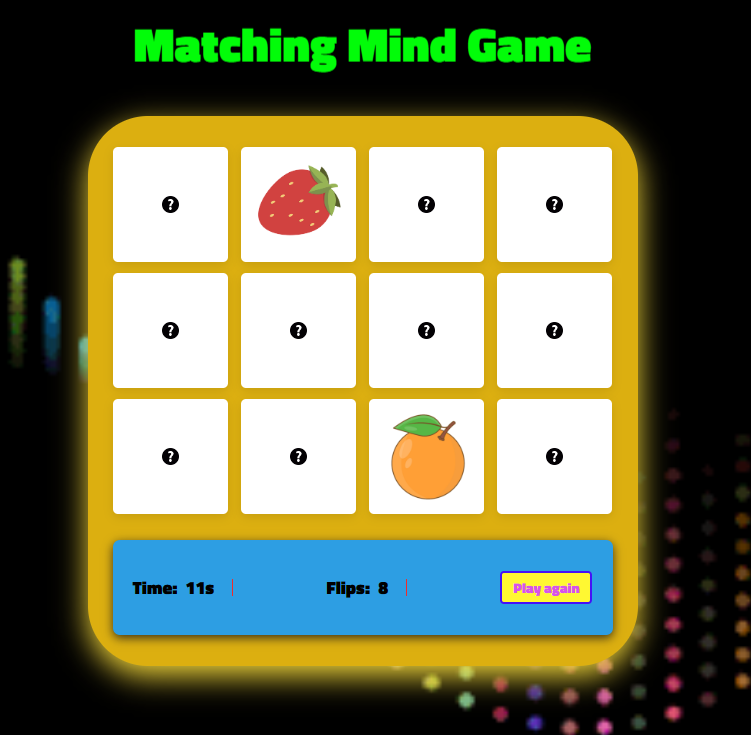
ถ้าเปิดถูกรูปก็จะแสดงรูปค้างไว้ และถ้าเพื่อน ๆ สังเกตกันก็จะมียอดจำนวนครั้งในการเปิด กับเวลาแสดงให้เราเห็นตาม Function ที่เราเขียนไปด้วยแหละนะ
สุดยอดไปเลยเล่นกันเพลิน ๆ ไปเลยยย เพียงเท่านี้เราก็จะได้เกมจับคู่ภาพด้วยฝึมือของเราเองแล้วนะเพื่อน ๆ เป็นไงทำง่ายกว่าที่คิดอีกเนอะว่าไหม ?
สุดท้ายนี้ถ้าเพื่อน ๆ ชื่นชอบบทความนี้และคิดว่าเป็นประโยชน์ก็อย่าลืมกด ❤ ให้กันเพื่อที่จะได้ไม่พลาดความรู้ใหม่ ๆ ที่ส่งตรงถึงที่ให้กันแบบฟรี ๆ ไปเลย และในครั้งหน้าจะเป็นเรื่องอะไรอีกอย่าลืมติดตามกันไว้ ในตอนนี้ผมก็ต้องขอตัวลาไปก่อนละค้าบ ฟ้าววว🕊️…
ขอบคุณที่เข้ามาอ่านกันนะครับ🙏
.
🦖 borntoDev – สร้างการเรียนรู้ที่ดี สำหรับสายไอทีในทุกวัน

แนะนำสำหรับคุณ
สงวนลิขสิทธิ์ © 2565 - ข้อมูลและเนื้อหาทั้งหมด - บริษัท บอร์นทูเดฟ จำกัด