สารจากผู้เขียน
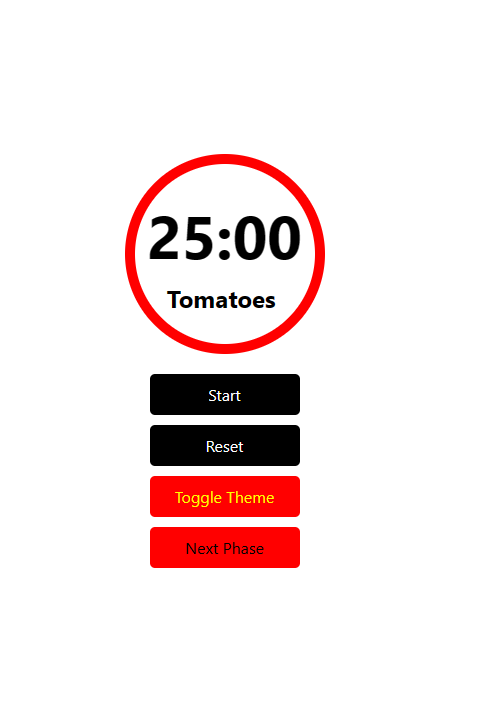
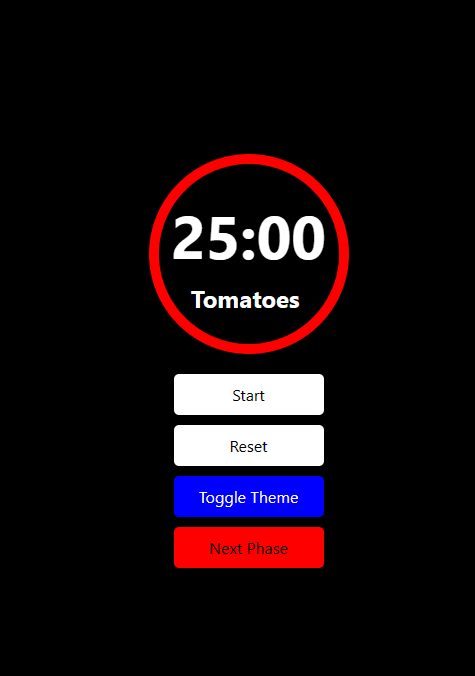
พบกันอีกครั้งนะครับเพื่อน ๆ ในวันนี้ผมจะพาเพื่อน ๆ ไปต่อยอดแปลงโฉมแอป Timer ของเราให้เปลี่ยนสี Theme ในหน้า Timer ของเราได้เมื่อมีการคลิก จะทำยังไง แล้วต้องสร้าง Function แบบไหนไปดูกัน
พบกันอีกครั้งนะครับเพื่อน ๆ ในวันนี้ผมจะพาเพื่อน ๆ ไปต่อยอดแปลงโฉมแอป Timer ของเราให้เปลี่ยนสี Theme ในหน้า Timer ของเราได้เมื่อมีการคลิก จะทำยังไง แล้วต้องสร้าง Function แบบไหนไปดูกัน

 เขียนโดย
Chairawit Iamkhajornchai
Internship @ borntoDev
บทความนี้ตีพิมพ์ และ เผยแพร่เมื่อ 08 สิงหาคม 2566
โดยผมจะเริ่มจากประกาศสร้างตัวแปรโดยใช้ useState ตั้งต้นเป็น false ไว้นะ
const [isDarkTheme, setIsDarkTheme] = useState(false);
และตามด้วยสร้าง Function สำหรับไว้กดปุ่มเพื่อเปลี่ยนสี Theme ไปมาได้
const toggleTheme = () => {
    setIsDarkTheme((prevIsDarkTheme) => !prevIsDarkTheme);
  };
และต่อมาให้เพื่อน ๆ ไปปรับตรงส่วน return ด้วยนะตามนี้เลย
return (
    <View style={[styles.container, isDarkTheme ? styles.darkTheme : styles.lightTheme]}>
      <View style={[styles.circle, { borderColor: currentPhase.color }]}>
        <Text style={[styles.timerText, { color: isDarkTheme ? 'white' : 'black' }]}>
          {formatTime(seconds)}
        </Text>
        <Text style={[styles.phaseText, { color: currentPhase.color, color: isDarkTheme ? 'white' : 'black' }]}>
          {currentPhase.name}
        </Text>
      </View>
      <View style={styles.buttonContainer}>
        <TouchableOpacity
          style={[
            styles.button,
            isRunning ? styles.stopButton : styles.startButton,
            { backgroundColor: isDarkTheme ? 'white' : 'black' },
          ]}
          onPress={handleStartStop}
        >
          <Text style={[styles.buttonText, { color: isDarkTheme ? 'black' : 'white' }]}>
            {isRunning ? 'Stop' : 'Start'}
          </Text>
        </TouchableOpacity>
        <TouchableOpacity
          style={[styles.button, { backgroundColor: isDarkTheme ? 'white' : 'black' }]}
          onPress={handleReset}
        >
          <Text style={[styles.buttonText, { color: isDarkTheme ? 'black' : 'white' }]}>Reset</Text>
        </TouchableOpacity>
        <TouchableOpacity
          style={[styles.button, { backgroundColor: isDarkTheme ? 'black' : currentPhase.color }]}
          onPress={toggleTheme}
        >
          <Text style={[styles.buttonText, { color: isDarkTheme ? 'white' : 'black' }]}>
            Toggle Theme
          </Text>
        </TouchableOpacity>
        <TouchableOpacity
          style={[styles.button, { backgroundColor: currentPhase.color }]}
          onPress={handleNextPhase}
        >
          <Text style={styles.buttonText}>{phaseIndex === 2 ? 'Restart' : 'Next Phase'}</Text>
        </TouchableOpacity>
      </View>
    </View>
  );
};
เพื่อให้ Components แต่ละส่วนรองรับการปรับเปลี่ยน Theme เมื่อเรากดปุ่มไปและเพิ่ม Styles เข้าไปเสริมอีกตามนี้เลยเพื่อเปลี่ยนสีพื้นหลัง
darkTheme: {
    backgroundColor: 'black',
  },
  lightTheme: {
    backgroundColor: 'white',
  },
โค้ดทั้งหมดก็จะหน้าตาเป็นประมาณนี้เลย
import React, { useState, useEffect } from 'react';
import { View, StyleSheet, Text, TouchableOpacity } from 'react-native';

const Timer = ({ onReset }) => {
  const [phaseIndex, setPhaseIndex] = useState(0); // Initial phase index is 0 (Work phase)
  const [isRunning, setIsRunning] = useState(false);
  const [seconds, setSeconds] = useState(25 * 60); // Set initial time to 25 minutes (Work phase)
  const [isDarkTheme, setIsDarkTheme] = useState(false); // Added state for the theme

  const phases = [
    { name: 'Tomatoes ', duration: 25 * 60, color: 'red' },
    { name: 'Short Break', duration: 5 * 60, color: 'coral' },
    { name: 'Long Break', duration: 15 * 60, color: 'cyan' },
  ];

  useEffect(() => {
    let interval = null;

    if (isRunning && seconds > 0) {
      interval = setInterval(() => {
        setSeconds((prevSeconds) => prevSeconds - 1);
      }, 1000);
    } else {
      clearInterval(interval);
    }

    return () => clearInterval(interval);
  }, [isRunning, seconds]);

  const currentPhase = phases[phaseIndex];

  const formatTime = (time) => {
    const minutes = Math.floor(time / 60);
    const seconds = time % 60;

    return `${minutes}:${seconds.toString().padStart(2, '0')}`;
  };

  const handleStartStop = () => {
    setIsRunning(!isRunning);
  };

  const handleReset = () => {
    setPhaseIndex(0); // Reset phase index to Work phase
    setSeconds(25 * 60);
    setIsRunning(false);
    onReset();
  };

  const handleNextPhase = () => {
    const nextPhaseIndex = (phaseIndex + 1) % phases.length;
    setPhaseIndex(nextPhaseIndex);
    setSeconds(phases[nextPhaseIndex].duration);
    setIsRunning(false);
    onReset();
  };

  // toggle the theme
  const toggleTheme = () => {
    setIsDarkTheme((prevIsDarkTheme) => !prevIsDarkTheme);
  };
return (
    <View style={[styles.container, isDarkTheme ? styles.darkTheme : styles.lightTheme]}>
      <View style={[styles.circle, { borderColor: currentPhase.color }]}>
        <Text style={[styles.timerText, { color: isDarkTheme ? 'white' : 'black' }]}>
          {formatTime(seconds)}
        </Text>
        <Text style={[styles.phaseText, { color: currentPhase.color, color: isDarkTheme ? 'white' : 'black' }]}>
          {currentPhase.name}
        </Text>
      </View>
      <View style={styles.buttonContainer}>
        <TouchableOpacity
          style={[
            styles.button,
            isRunning ? styles.stopButton : styles.startButton,
            { backgroundColor: isDarkTheme ? 'white' : 'black' },
          ]}
          onPress={handleStartStop}
        >
          <Text style={[styles.buttonText, { color: isDarkTheme ? 'black' : 'white' }]}>
            {isRunning ? 'Stop' : 'Start'}
          </Text>
        </TouchableOpacity>
        <TouchableOpacity
          style={[styles.button, { backgroundColor: isDarkTheme ? 'white' : 'black' }]}
          onPress={handleReset}
        >
          <Text style={[styles.buttonText, { color: isDarkTheme ? 'black' : 'white' }]}>Reset</Text>
        </TouchableOpacity>
        <TouchableOpacity
          style={[styles.button, { backgroundColor: isDarkTheme ? 'black' : currentPhase.color }]}
          onPress={toggleTheme}
        >
          <Text style={[styles.buttonText, { color: isDarkTheme ? 'white' : 'black' }]}>
            Toggle Theme
          </Text>
        </TouchableOpacity>
        <TouchableOpacity
          style={[styles.button, { backgroundColor: currentPhase.color }]}
          onPress={handleNextPhase}
        >
          <Text style={styles.buttonText}>{phaseIndex === 2 ? 'Restart' : 'Next Phase'}</Text>
        </TouchableOpacity>
      </View>
    </View>
  );
};

const styles = StyleSheet.create({
  container: {
    flex: 1,
    justifyContent: 'center',
    alignItems: 'center',
  },
  darkTheme: {
    backgroundColor: 'black',
  },
  lightTheme: {
    backgroundColor: 'white',
  },
  circle: {
    width: 200,
    height: 200,
    borderRadius: 100,
    borderWidth: 10,
    justifyContent: 'center',
    alignItems: 'center',
  },
  timerText: {
    fontSize: 60,
    fontWeight: 'bold',
    textAlign: 'center',
  },
  phaseText: {
    fontSize: 24,
    fontWeight: 'bold',
    textAlign: 'center',
    marginTop: 8,
  },
  buttonContainer: {
    marginTop: 20,
    width: 150,
  },
  button: {
    paddingVertical: 10,
    paddingHorizontal: 20,
    borderRadius: 5,
    marginBottom: 10,
  },
  buttonText: {
    fontSize: 16,
    textAlign: 'center',
  },
  startButton: {
    backgroundColor: 'green',
  },
  stopButton: {
    backgroundColor: 'red',
  },
});

export default Timer;


เพียงเท่านี้แอป Timer ของเราก็สามารถเปลี่ยนสี Theme ได้แล้ว แค่นี้เราก็ได้แอปที่ผู้ใช้งานสามารถเลือกใช้ได้ตามสะดวกเลย หรือใครจะนำไปต่อยอดให้มากกว่านี้ก็สามารถทำได้นะ😉👌
สุดท้ายนี้ถ้าเพื่อน ๆ ชื่นชอบบทความนี้และคิดว่าเป็นประโยชน์ก็อย่าลืมกด ❤ ให้กันเพื่อที่จะได้ไม่พลาดความรู้ใหม่ ๆ ที่ส่งตรงถึงที่ให้กันแบบฟรี ๆ ไปเลย และในครั้งหน้าจะเป็นเรื่องอะไรอีกอย่าลืมติดตามกันไว้ ในตอนนี้ผมก็ต้องขอตัวลาไปก่อนละค้าบ บรื้นนนน🚗…
.
ขอบคุณที่เข้ามาอ่านกันนะครับ🙏
.
🦖 borntoDev – สร้างการเรียนรู้ที่ดี สำหรับสายไอทีในทุกวัน

แนะนำสำหรับคุณ
เราใช้คุกกี้เพื่อพัฒนาประสิทธิภาพ และประสบการณ์ที่ดีในการใช้เว็บไซต์ของคุณ คุณสามารถศึกษารายละเอียดได้ที่ นโยบายความเป็นส่วนตัว และสามารถจัดการความเป็นส่วนตัวเองได้ของคุณได้เองโดยคลิกที่ ตั้งค่า