EXE คืออะไร ?
EXE ย่อมาจาก Executable ซึ่งเป็นประเภทไฟล์มาตรฐานใน Windows โปรแกรมที่เราใช้งานกันโดยทั่วๆไปถ้าไปดูในโฟลเดอร์ที่ติดตั้งโปรแกรมเอาไว้ โปรแกรมต่างๆที่เราเปิดด้วยการดับเบิ้ลคลิกนั้นส่วนใหญ่จะมี .exe ต่อท้ายนั่นเอง (แต่ที่เราใช้กันจริงๆจะใช้ผ่าน Shortcut ที่ชี้เรียก .exe ให้เราอีกที)
ไฟล์ EXE มันดียังไง ?
สมมติว่าเราเขียนโปรแกรมด้วยภาษา Python ที่มีนามสกุลไฟล์เป็น .py เวลาที่เราจะใช้งานก็ต้องรันคำสั่งเพื่อเรียกใช้งาน อย่างเช่นเรามีโค้ดโปรแกรมเครื่องคิดเลข (โค้ดจาก https://www.geeksforgeeks.org/python-simple-gui-calculator-using-tkinter/)
# Python program to create a simple GUI
# calculator using Tkinter

# import everything from tkinter module
from tkinter import *

# globally declare the expression variable
expression = ""


# Function to update expressiom
# in the text entry box
def press(num):
   # point out the global expression variable
   global expression

   # concatenation of string
   expression = expression + str(num)

   # update the expression by using set method
   equation.set(expression)


# Function to evaluate the final expression
def equalpress():
   # Try and except statement is used
   # for handling the errors like zero
   # division error etc.

   # Put that code inside the try block
   # which may generate the error
   try:

      global expression

      # eval function evaluate the expression
      # and str function convert the result
      # into string
      total = str(eval(expression))

      equation.set(total)

      # initialze the expression variable
      # by empty string
      expression = ""

   # if error is generate then handle
   # by the except block
   except:

      equation.set(" error ")
      expression = ""


# Function to clear the contents
# of text entry box
def clear():
   global expression
   expression = ""
   equation.set("")


# Driver code
if __name__ == "__main__":
   # create a GUI window
   gui = Tk()

   # set the background colour of GUI window
   gui.configure(background="light green")

   # set the title of GUI window
   gui.title("Simple Calculator")

   # set the configuration of GUI window
   gui.geometry("270x150")

   # StringVar() is the variable class
   # we create an instance of this class
   equation = StringVar()

   # create the text entry box for
   # showing the expression .
   expression_field = Entry(gui, textvariable=equation)

   # grid method is used for placing
   # the widgets at respective positions
   # in table like structure .
   expression_field.grid(columnspan=4, ipadx=70)

   equation.set('enter your expression')

   # create a Buttons and place at a particular
   # location inside the root window .
   # when user press the button, the command or
   # function affiliated to that button is executed .
   button1 = Button(gui, text=' 1 ', fg='black', bg='red',
                     command=lambda: press(1), height=1, width=7)
   button1.grid(row=2, column=0)

   button2 = Button(gui, text=' 2 ', fg='black', bg='red',
                     command=lambda: press(2), height=1, width=7)
   button2.grid(row=2, column=1)

   button3 = Button(gui, text=' 3 ', fg='black', bg='red',
                     command=lambda: press(3), height=1, width=7)
   button3.grid(row=2, column=2)

   button4 = Button(gui, text=' 4 ', fg='black', bg='red',
                     command=lambda: press(4), height=1, width=7)
   button4.grid(row=3, column=0)

   button5 = Button(gui, text=' 5 ', fg='black', bg='red',
                     command=lambda: press(5), height=1, width=7)
   button5.grid(row=3, column=1)

   button6 = Button(gui, text=' 6 ', fg='black', bg='red',
                     command=lambda: press(6), height=1, width=7)
   button6.grid(row=3, column=2)

   button7 = Button(gui, text=' 7 ', fg='black', bg='red',
                     command=lambda: press(7), height=1, width=7)
   button7.grid(row=4, column=0)

   button8 = Button(gui, text=' 8 ', fg='black', bg='red',
                     command=lambda: press(8), height=1, width=7)
   button8.grid(row=4, column=1)

   button9 = Button(gui, text=' 9 ', fg='black', bg='red',
                     command=lambda: press(9), height=1, width=7)
   button9.grid(row=4, column=2)

   button0 = Button(gui, text=' 0 ', fg='black', bg='red',
                     command=lambda: press(0), height=1, width=7)
   button0.grid(row=5, column=0)

   plus = Button(gui, text=' + ', fg='black', bg='red',
                  command=lambda: press("+"), height=1, width=7)
   plus.grid(row=2, column=3)

   minus = Button(gui, text=' - ', fg='black', bg='red',
                   command=lambda: press("-"), height=1, width=7)
   minus.grid(row=3, column=3)

   multiply = Button(gui, text=' * ', fg='black', bg='red',
                      command=lambda: press("*"), height=1, width=7)
   multiply.grid(row=4, column=3)

   divide = Button(gui, text=' / ', fg='black', bg='red',
                    command=lambda: press("/"), height=1, width=7)
   divide.grid(row=5, column=3)

   equal = Button(gui, text=' = ', fg='black', bg='red',
                   command=equalpress, height=1, width=7)
   equal.grid(row=5, column=2)

   clear = Button(gui, text='Clear', fg='black', bg='red',
                   command=clear, height=1, width=7)
   clear.grid(row=5, column='1')

   Decimal= Button(gui, text='.', fg='black', bg='red',
                    command=lambda: press('.'), height=1, width=7)
   Decimal.grid(row=6, column=0)
   # start the GUI
   gui.mainloop()
เซฟไว้ในไฟล์ชื่อ main.py ถ้าเราจะใช้งานอย่างเช่นใน Windows 10 ก็เปิด PowerShell แล้วไปที่ที่ไฟล์ main.py ของเราอยู่แล้วสั่งรันด้วยคำสั่ง
python main.pyซึ่งมันไม่ง่ายเหมือนการเปิดโปรแกรมทั่วๆไป อย่างการเปิดเบราเซอร์ที่เราก็แค่ดับเบิลคลิกที่ไอคอนหรือไฟล์ .exe ของโปรแกรม ก็สามารถใช้งานได้ทันที อีกเรื่องที่ทำให้ไฟล์ .py ใช้งานไม่สะดวกก็คือ ไม่ใช่ว่าทุกๆคนจะติดตั้ง python ไว้ในเครื่อง ถ้าเราต้องการเอาโปรแกรมของเราให้คนอื่นใช้งานได้ด้วยการทำเป็นไฟล์ .exe ก็เป็นวิธีที่ง่ายและเหมาะสมในการส่งต่อโปรแกรมให้คนอื่นใช้งาน
แปลง .Py ให้กลายเป็น .Exe
เครื่องมือที่เราจะใช้กันก็คือ library ที่ชื่อว่า pyinstaller ซึ่งสามารถสร้างไฟล์ .exe ให้เราได้ด้วยคำสั่งบรรทัดเดียว ลองทำโปรแกรม Hello World ของเราให้เป็น .exe กันเลย
1. ติดตั้ง pyinstaller ด้วยคำสั่ง
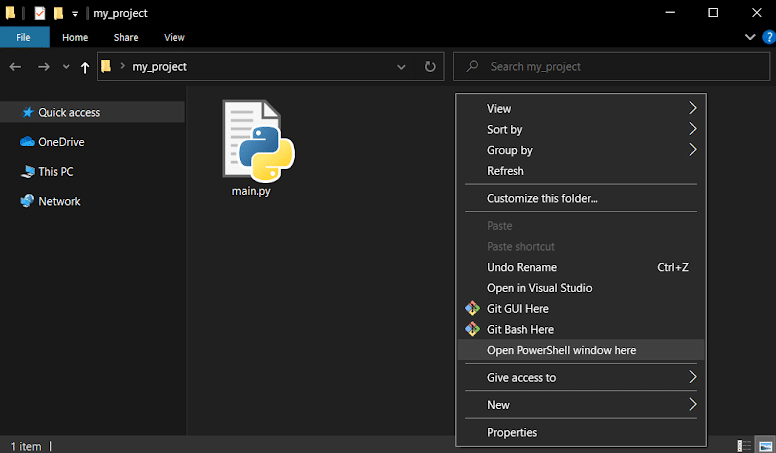
pip install pyinstallerเปิด PowerShell ไปที่ที่ไฟล์ main.py ของเราอยู่ ถ้าขี้เกียจพิมพ์ cd เพื่อไปที่ path นั้น ก็เปิด File Explorer ไปที่ไฟล์ของเราแล้ว กด shift ค้างไว้ แล้วคลิกขวาเลือกเมนู Open PowerShell here
3. พิมพ์คำสั่ง
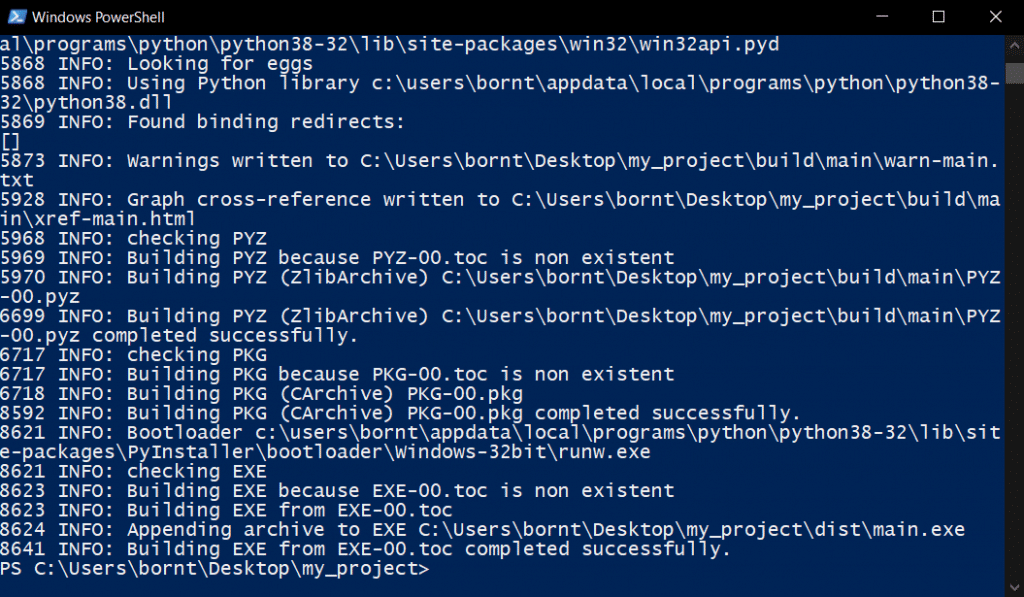
pyinstaller --onefile --noconsole main.pyแล้วกด Enter–onefile ทำให้ทุกอย่างรวมอยู่ในไฟล์ .exe เพียงไฟล์เดียว
–noconsole ทำให้เปิดโปรแกรมโดยที่ไม่แสดง console
4. รอโปรแกรมรันสักพักจนขึ้นว่า completed successfully.
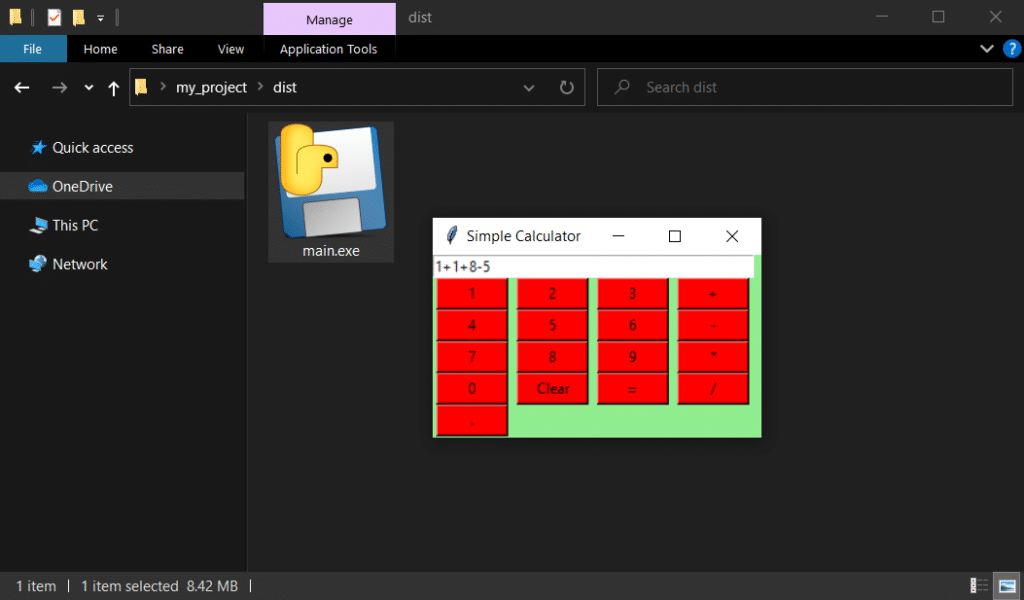
5. ก็จะเห็นว่ามีโฟล์เดอร์โผล่มาข้างๆไฟล์ main.py ของเรา

6. ไฟล์ exe ของเราจะอยู่ในโฟลเดอร์ dist ชื่อไฟล์ว่า main.exe ลองดับเบิลคลิกดูก็จะเปิดโปรแกรมเครื่องคิดเลขของเราขึ้นมาได้แล้ว ซึ่งถ้าจะเอาโปรแกรมไปใช้ที่อื่นก็แค่ก็อปปี้ไฟล์นี้ไปก็พอ
สำหรับ pyinstaller เราสามารถตั้งค่ารายละเอียดในการสร้างไฟล์ exe ออกมาได้ อย่างด้านบนที่ใช้ไปก็คือ –onefile และ –noconsole ซึ่งยังมีคำสั่งให้เอาไปปรับใช้ให้เหมาะกับโปรแกรมแต่ละตัวได้อีกเยอะ ลองไปอ่านเพิ่มเติมได้ที่ https://www.pyinstaller.org/